Bring your own robot
This guide takes a robot from its URDF to a running simulation, using a FANUC CRX-3iA as the example. FANUC publishes the URDF, and like most industrial arms the CRX comes without a gripper — so you'll also see how to attach one, and how to swap it for another. The steps are the same for any URDF. If you haven't yet, do the tutorial with the Franka first: you'll know what success looks like.
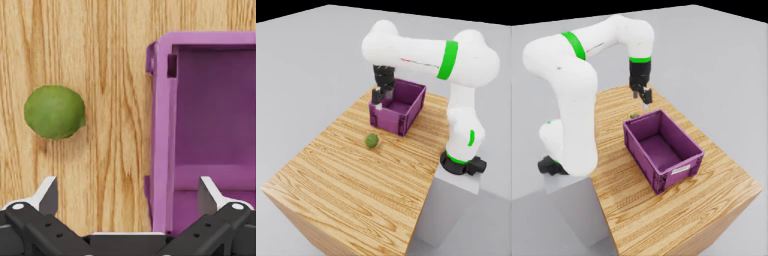
1. Get the URDF
FANUC publishes the descriptions of its robots in
FANUC-CORPORATION/fanuc_description (Apache-2.0) as
xacro files. The example script downloads a pinned version and expands the CRX-3iA into a URDF. It needs xacro.
Without ROS (for example on a cloud GPU), install it into urdf2vla's environment; it gives the same URDF as ROS 2's
xacro:
uv pip install xacro                  # or, with ROS 2: source /opt/ros/jazzy/setup.bash
bash examples/crx3ia/fetch_urdf.sh    # → examples/crx3ia/fanuc_description/crx3ia.urdf
Other CRX models expand the same way — bash examples/crx3ia/fetch_urdf.sh crx10ia_l (also crx5ia, crx10ia,
crx10ia_lp, crx20ia_l, crx30ia). urdf2vla is tested with the CRX-3iA.
urdf2vla reads everything it can from the URDF. Before you start, make sure that:
- Meshes can be found.
package://my_robot_description/meshes/...paths are resolved by searching the URDF's parent folders and any folders you list inrobot.package_paths; absolute paths from another machine (file:///root/ws/install/...) are matched by their tail under the same folders. Meshes outside the repository are copied into the project automatically, so the container can read them. Meshes of the arm and of a gripper you keep must be found; parts like a wrist camera or its bracket are imported without a shape, with a warning. - Joint limits and efforts are real values. urdf2vla warns when every joint has the same effort or a joint has no limits — CAD exporters often write placeholders. You can override efforts without editing the URDF (see below).
- There is a gripper — in the URDF, or one you attach from NVIDIA's asset library. Supported today: one- or two-arm robots with a two-finger gripper (see Dual-arm robots).
A xacro file has to be expanded first: xacro my_robot.urdf.xacro -o my_robot.urdf.
Besides the FANUC CRX-3iA and the Franka, the KUKA LBR iiwa 14 and the Kinova Gen3 went from their public URDFs to recorded demonstrations with these steps.
2. Create a project
This creates projects/crx3ia/project.yaml, the only file you edit. Everything urdf2vla derives goes into
generated/, build/, snapshots/ and logs/ next to it — don't edit those by hand.
name: crx3ia

robot:
  urdf: ../../examples/crx3ia/fanuc_description/crx3ia.urdf
  gripper: {simready: robotiq_2f_85, mount_link: fanuc_flange}   # attach a gripper (section 3)

cameras:          # DROID layout: wrist + left + right
  - preset: wrist
  - preset: left
  - preset: right

overrides:        # change generated values without editing generated/
  robot: {}
  task: {}
  cameras: {}
For another robot, start from its URDF instead — urdf2vla init projects/myrobot --urdf /path/to/my_robot.urdf —
and add any of these under robot: if you already know them (anything you write here is not asked again):
robot:
  urdf: /path/to/my_robot.urdf
  # end_effector: tool0
  # gripper_joints: [finger_left, finger_right]
  # gripper_open_position: upper        # fingers open at the joint's lower or upper limit
  # default_pose: {joint1: 0.0, joint2: -0.6}
  # effort_limits: {"joint[1-6]": 50.0} # N·m, joint-name regex → value
  # base_pose: {pos: [0, 0, 0], rot_xyzw: [0, 0, 0, 1]}
  # package_paths: [../my_ws/src]
Messages are in Japanese
urdf2vla's command output, questions and the comments in project.yaml are currently in Japanese. The keys
(arms.0.ee_link, status, …) and file names are the same in every language, and this guide explains each of them.
3. Attach or swap the gripper
Decide this before you run the steps: an arm without a gripper needs one, and the first step asks about the gripper.
The gripper decides what the robot can pick up, so it is also the part you'll change most often. urdf2vla can attach a
gripper from NVIDIA's asset library — the robot and gripper models that ship with Isaac Sim, with physics already
set up — to any arm, with one line in project.yaml. The CRX-3iA example already has that line, so you can go
straight to running the steps and come back here to swap grippers later.
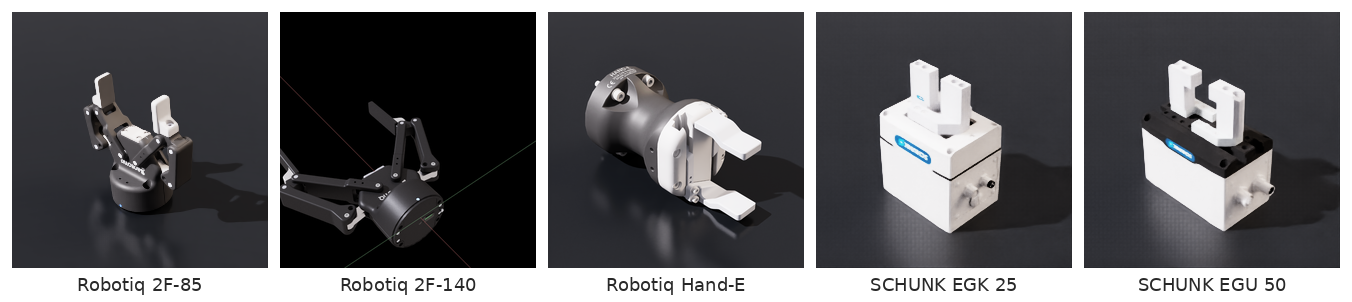
Thumbnails from the NVIDIA Isaac Sim 6.2 asset library. Robotiq 2F-85, SCHUNK EGK 25 and EGU 50 assets: CC BY 4.0. Robotiq 2F-140 and Hand-E: BSD-3-Clause, © 2013 ROS-Industrial. Details: THIRD_PARTY_NOTICES.txt.
When to use it
- The arm has no gripper, like FANUC's URDFs.
- The URDF's gripper doesn't hold things in simulation. Closed linkages are simplified, mimic joints are converted
badly, or joint limits aren't enforced. The symptom is a gripper that opens and closes but can't hold the cube —
urdf2vla's
joint_limits_holdandgrasp_holdchecks fail. - You want to try another gripper — a wider opening for bigger objects, or the gripper you have on the real robot.
One line in project.yaml
simready: |
Gripper | Opening | Length (flange to fingertips) | Works with (CRX-3iA) | Asset license |
|---|---|---|---|---|---|
robotiq_2f_85 |
Robotiq 2F-85 | 85 mm | 14.8 cm | apple, lime, pear, cube — 10 of 12 scripted recordings succeeded | CC BY 4.0 |
ufactory_xarm |
UFactory xArm Gripper | 88 mm | 16.2 cm | lime — 5 of 5 recordings. The apple and the pear slip out; the cube is held, but the long fingers touch the table before the hand is low enough to grasp it | not stated (no license file in the asset folder) |
The values are measured from each asset; they live in src/urdf2vla/grippers.py. The other grippers in the picture
above aren't supported yet: the Robotiq 2F-140's closed linkage comes apart in our setup, the Hand-E drives its two
jaws separately, and the SCHUNK grippers open less than the objects are wide.
Swapping, step by step
Change the key and rerun from configure_robot. Everything that depends on the gripper is recomputed:
# robot.gripper.simready: ufactory_xarm
urdf2vla configure_robot  --project projects/crx3ia   # where the fingers grasp (the TCP), approach and finger directions
urdf2vla configure_task   --project projects/crx3ia   # which objects fit between the fingers, where the table goes
urdf2vla configure_camera --project projects/crx3ia   # the wrist camera follows the new gripper
urdf2vla import_robot     --project projects/crx3ia   # attaches the gripper with Isaac Sim's Robot Assembler
urdf2vla launch_sim       --project projects/crx3ia   # checks that it opens, closes and holds each object
| What changes | Done by | With the xArm Gripper instead of the 2F-85 |
|---|---|---|
| The grasp point (TCP) and the approach and finger directions | configure_robot |
the grasp point is 2 cm from the fingertips instead of 1.2 cm (the xArm's finger pads are longer) |
| Objects too wide for the gripper are left out, with a warning | configure_task |
none: all four objects fit between the fingers |
| The table is brought closer if the hand can't reach the work area pointing down | configure_task |
the table moves 12 cm closer instead of 10 cm |
| The gripper is attached to the arm's USD (downloaded the first time) | import_robot |
the xArm Gripper asset is downloaded and attached |
| Grip force, solver iterations; checks that it opens, closes and holds each object | import_robot, launch_sim |
grasp_hold fails for the apple and the pear |
A failing grasp_hold tells you which objects this gripper can't hold, and the attempts in
build/collect_report.yaml tell you which ones the scripted recording can't pick up. Leave them out and run
configure_task and launch_sim again:
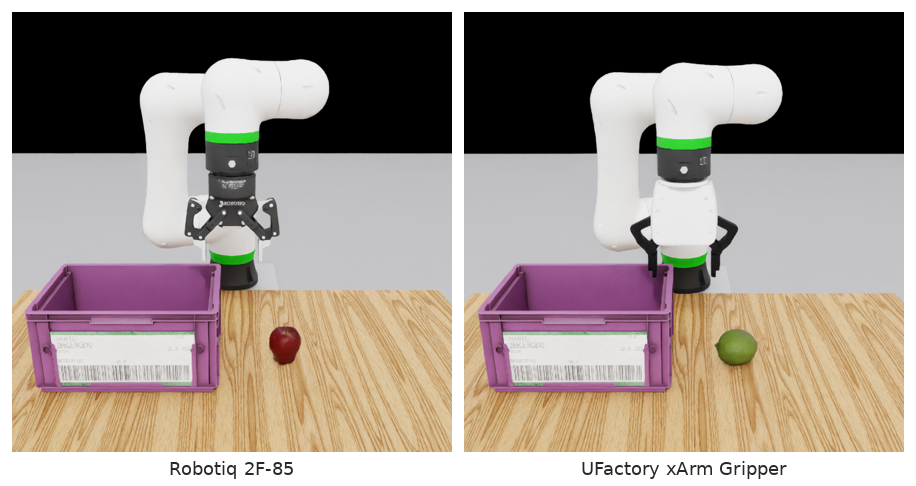
launch_sim. Only robot.gripper.simready (and, for the xArm, the object list) differs between the two
projects.Where the gripper goes (mount_link)
On an arm without a gripper, mount_link is optional. urdf2vla mounts the gripper on the outermost frame at the end of
the arm — the flange or tool frame, such as tool0 or FANUC's fanuc_flange — with the fingers pointing out of the
flange face (along the last joint's axis, on the flange side). configure_robot says which frame it chose and lists
the others; write mount_link to choose one of them. The fingers point out of the flange whichever frame you choose,
even one whose +x, not +z, leaves the flange (FANUC's flange).
If the attached gripper looks wrong, the launch_sim snapshots show it at once.
Replacing a gripper that's in the URDF
If the URDF has its own gripper, write only gripper: {simready: robotiq_2f_85}. configure_robot removes the URDF
gripper's links and mounts the new one at the same place, aligning its approach and finger directions with the old
one. Add mount_link only to mount it somewhere else. The replaced gripper's meshes don't need to be found.
Other grippers from the asset library can be added by a developer (see DEVELOPMENT.md).
4. Run the setup steps and answer questions
urdf2vla inspect_robot    --project projects/crx3ia
urdf2vla configure_robot  --project projects/crx3ia
urdf2vla configure_task   --project projects/crx3ia
urdf2vla configure_camera --project projects/crx3ia
urdf2vla import_robot     --project projects/crx3ia
Every command prints a JSON result. "status" tells you what to do next:
status |
Exit code | Meaning |
|---|---|---|
ok |
0 | Done. next names the following step. Read any warnings. |
needs_input |
2 | urdf2vla needs a fact about your robot. Answer the questions, then run the step in next. |
error |
1 | A step or a check failed. errors says which; run urdf2vla diagnose --project ... and see Troubleshooting. |
With the CRX-3iA you'll see:
configure_robot— mounting the Robotiq 2F-85 onfanuc_flange. The hand questions (which link is the hand, which way the fingers open) are not asked, because the gripper's geometry comes from the asset.configure_task— moved the table 10 cm closer. The CRX-3iA is small, and a gripper pointing straight down raises its wrist by the gripper's length, so urdf2vla checks with inverse kinematics that the hand can reach the whole work area pointing down, and brings the table in until it can.import_robot—needs_input: FANUC's zero pose doesn't point the hand at the table, so it proposes a starting pose found by inverse kinematics and asksrobot.default_pose.
Answer on the command line, then run the step named in next and continue:
urdf2vla answer --project projects/crx3ia robot.default_pose=suggested
urdf2vla configure_robot --project projects/crx3ia
urdf2vla import_robot    --project projects/crx3ia
urdf2vla launch_sim      --project projects/crx3ia
…or answer in the browser, looking at the robot: urdf2vla view shows the candidates in 3D and saves
your answers to the same file (answers.yaml).
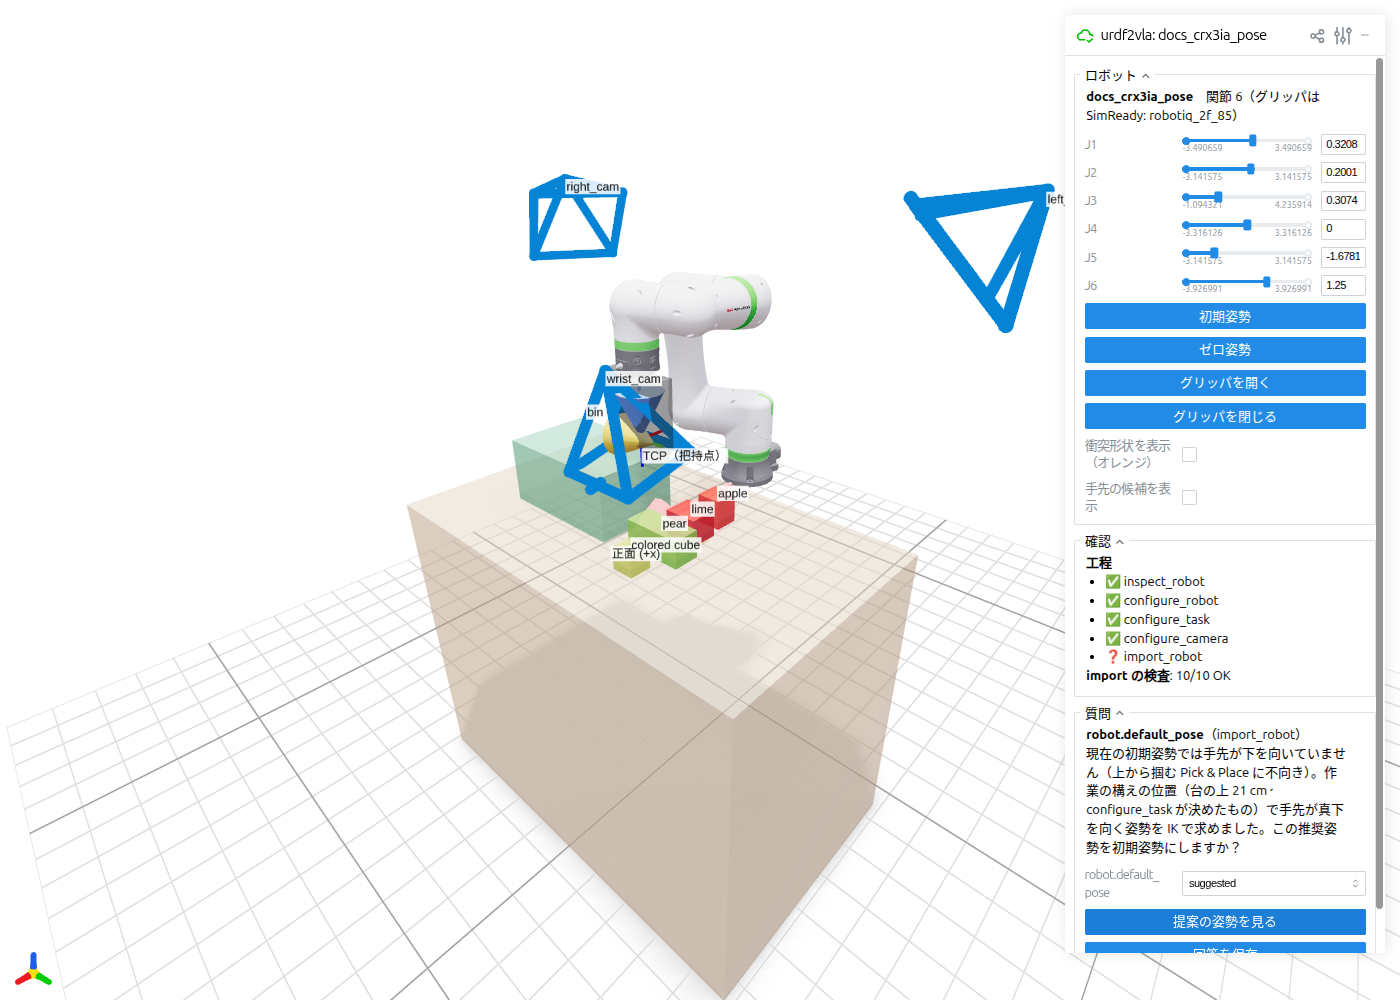
urdf2vla view. 提案の姿勢を見る (show the
suggested pose) moves the robot to the proposed pose before you answer suggested. The gray box stands in
for the attached gripper, which the viewer doesn't load.The questions you may get
| Key | You answer | Asked when |
|---|---|---|
arms.<i>.ee_link |
the link that is the robot's hand | more than one link could be the hand; dual-arm robots get one question per arm |
grippers.<i>.open_position |
lower or upper |
a revolute finger joint's opening direction isn't clear |
grippers.<i>.open_close |
[open, closed] angles in rad |
a finger joint has no limits |
robot.gripper_joints |
list of finger joint names | no gripper was found automatically |
robot.front_axis |
+x, +y, -x or -y |
the robot doesn't face +x; it is rotated so it does |
joints.<name>.role |
fixed_at_reset or passive |
a movable joint is neither arm nor gripper |
robot.default_pose |
suggested, keep or {joint: value, …} |
after import, the hand doesn't point down at the table; suggested is an IK solution with the hand pointing down at the working position configure_task chose |
5. Check the result and record
launch_sim saves what each camera sees at the start and end of a short test into snapshots/, and runs physics
checks — including picking up each object — before you spend time recording. For the CRX-3iA all 21 checks pass,
including grasp_hold with the apple, the lime, the pear and the cube. Then record, exactly as in the tutorial:
urdf2vla configure_vla_interface --project projects/crx3ia
urdf2vla setup_teleoperation     --project projects/crx3ia
urdf2vla collect_dataset         --project projects/crx3ia --device scripted --num-demos 10
On our machine the scripted controller recorded 10 demonstrations in 12 attempts, and all four replayed from the
converted dataset succeeded (convert_dataset, then evaluate_vla --replay --episodes 4).
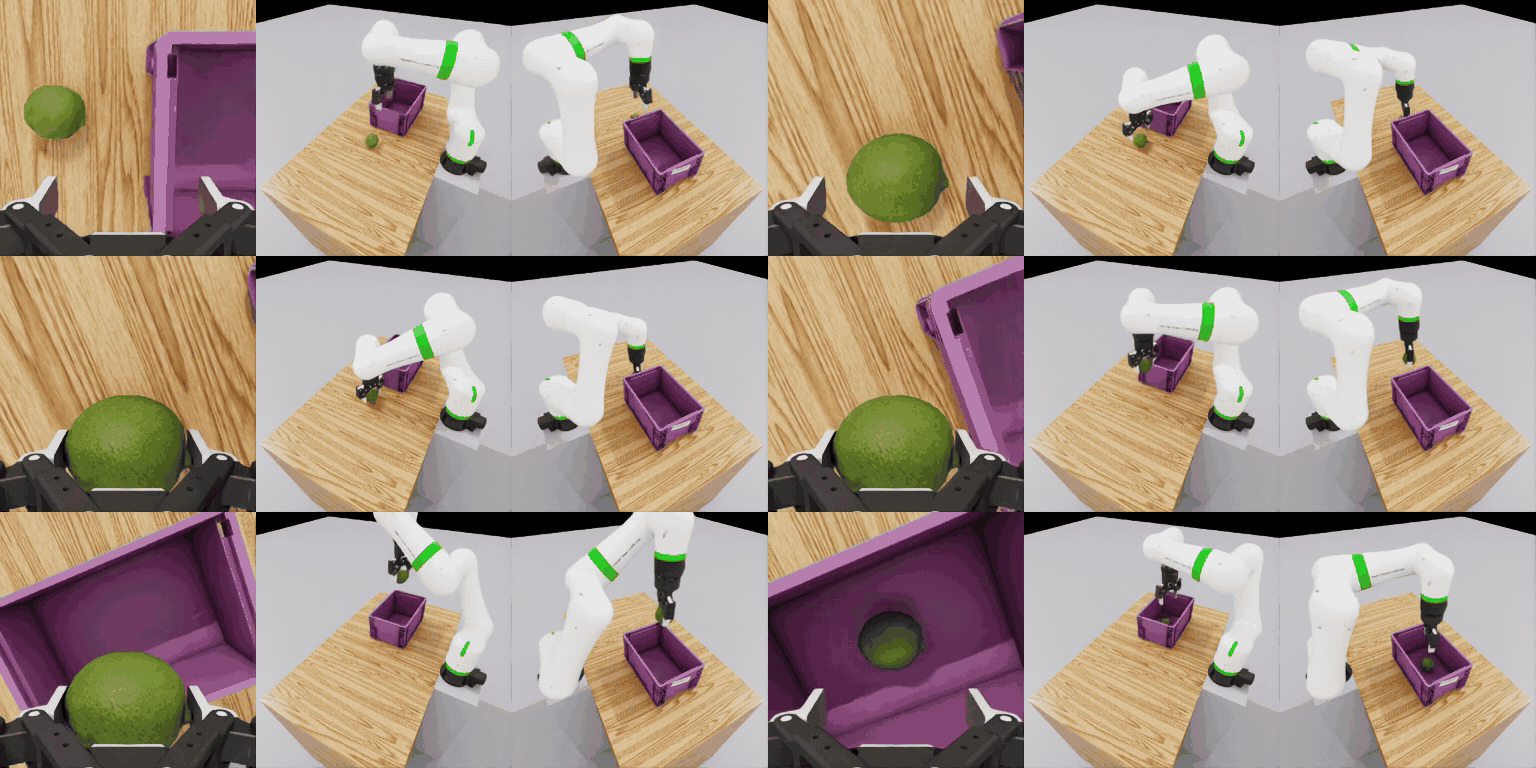
evaluate_vla
--replay).6. Choose the objects, adjust the scene and cameras
By default every episode puts one of four objects on the table — an apple, a lime, a pear or a colored cube — and the
robot has to put it in a bin. Choose others in project.yaml, then run configure_task and launch_sim again
(launch_sim measures how each object comes to rest; episodes use that):
task:
  objects: [lime, color_cube, rubiks_cube]   # one per episode, named in the instruction
  container: klt_bin                          # or plastic_tray, or "disc" for a flat green target
| Key | Object | Size (cm) | Source |
|---|---|---|---|
rubiks_cube |
Rubik's cube (not in the default list: its source dataset's license is unverified) | 5.8 × 5.8 × 5.8 | Isaac Lab Arena object library (from HOT3D) |
apple |
apple (scaled to 70 %) | 5.4 × 5.7 × 6.7 | NVIDIA SimReady |
lime |
lime | 6.4 × 7.5 × 6.1 | NVIDIA SimReady |
pear |
pear | 6.1 × 13.4 × 6.2 | NVIDIA SimReady |
color_cube |
colored cube | 5.0 × 5.0 × 5.0 | Isaac Sim props |
cube |
red cube (primitive, no download) | 4.5 × 4.5 × 4.5 | — |
klt_bin (container, default) |
bin | 19.8 × 29.7 × 14.6 | Isaac Sim props (industrial KLT bin) |
plastic_tray (container) |
tray | 25.6 × 27.0 × 2.1 | NVIDIA SimReady |
Datasets recorded with a different object list can't be replayed with the new one (the episodes store which entry
of the list they used). To replay recordings from before this object list existed, set
task: {objects: [cube], container: disc}.
Objects wider than your gripper can open are left out, with a warning (the Franka opens 8 cm; see the gripper table
above). The assets are downloaded from NVIDIA's asset server the first time. The catalog with the measured sizes is
src/urdf2vla/objects.py.
The table, spawn area and bin are placed from your arm's reach — and, for a single arm, checked with inverse
kinematics so the hand can reach them pointing down. To move them, write the generated keys under overrides.task
(same structure as generated/task.yaml) and run configure_task again:
overrides:
  task:
    target: {pos: [0.45, -0.18]}
    instruction: "place the {object} into the {target}"
    table: {material: walnut}        # the table surface: oak (default), walnut or plain
Cameras: if the URDF has camera frames (links whose names contain camera, cam or optical, such as a head
camera's optical frame or a camera on the hand), urdf2vla uses them. It adds a preset only where one is missing: a
wrist camera for an arm without one, and the left and right DROID cameras when there is no head or body camera.
inspect_robot lists the camera frames it found. If the URDF has no cameras, the default is the
DROID layout: a wrist camera plus left and right cameras looking down at the
table, 256×256. A dual-arm robot gets one wrist camera per arm, so that default is four images.
URDF cameras follow ROS conventions (an optical frame looks along +z, others along +x); the field of view comes from
a Gazebo camera sensor if the URDF has one. For a stereo camera the left frame is used.
The presets are wrist, left, right, front, side and urdf (URDF cameras). To match a real camera,
describe it explicitly:
cameras:
  - preset: wrist
  - {preset: urdf, link: head_camera_optical_frame, hfov_deg: 87, clip_near: 0.02}
  - {name: head_cam, mount: link, parent_link: head_link, pos: [0, 0, 0], rot_xyzw: [0, 0, 0, 1],
     convention: ros, width: 640, height: 480, intrinsic_matrix: [600, 0, 320, 0, 600, 240, 0, 0, 1]}
To place or aim cameras by eye, use the camera panel in urdf2vla view. What you save there goes to
answers.yaml and takes precedence over cameras: in project.yaml; run configure_camera and launch_sim again
to see the real images.
Quaternions are always [x, y, z, w].
Dual-arm robots
Two arm chains are detected separately and kept separate through setup, simulation and training. For each arm, urdf2vla derives its joints, IK body, TCP, approach/finger axes and optional wrist camera; the VLA state and action are ordered as both arm joint groups followed by both gripper scalars.
The table is centred between the shoulders, with the objects on its left half and the bin on its right half. The
built-in scripted expert grasps with the arm nearer to the object and keeps the other arm at its initial pose with its
gripper open. In this layout that is the same arm every episode, so scripted demonstrations move only one arm; the other
arm's joints and gripper are still recorded in every frame. launch_sim runs the grasp checks for each gripper.
For a two-arm robot the scripted expert is a self-test of the setup, not the way to build a dataset. To get data, record a few demonstrations yourself with teleop (N switches the arm) and multiply them with Isaac Lab Mimic: see Two-arm robots in the recording guide.
Try it with the bundled two-Franka example, which needs no download:
If your two arms hang off a common root link, give that link an <inertial>: without mass, the importer splits
the robot into two articulations and import_robot stops with Expected 1 prims at '/World/Robot', found 2.
| Example | Result |
|---|---|
Two Frankas (examples/dual_franka, no download) |
all checks, scripted recording, conversion and replay evaluation pass |
OpenArm v2.0 (examples/openarm) |
the same, with the table, tray and starting pose set by hand in the example (8 of 10 scripted recordings succeed) |
| Dual Scorpion | passes the checks; scripted recording doesn't succeed yet |
The per-robot settings behind these results are in the example project.yaml files and DEVELOPMENT.md.
Limitations
- Arms: one or two. More than two arm chains are not supported by the simulation embodiment.
- Dual-arm robots: the scripted expert and
generate_mimicuse one working arm per episode while the other arm stays still (Mimic: the arm that grasped in your source demonstrations). Tasks where both arms work together are not supported yet.evaluate_vla --droidis single-arm only. - One task: pick an object and place it in a container (or on a flat target). Objects come from the catalog in
src/urdf2vla/objects.py. - Grippers: two-finger parallel or single-moving-jaw grippers. Suction and multi-finger hands are not supported.
- The SimReady gripper replacement (
robot.gripper.simready) is currently limited to single-arm robots.